
Sunday, December 10, 2017
Oversized Sweater


Is anyone else sad the snow is gone? I really wish it snowed all the time so I could stay at home and not feel guilty about not doing anything! I feel like I am always on the run these days. When it snows it is always hard to decide what to wear because it is wet, and cold. This snow I decided to wear this amazing oversized sweater from Loft. It is so soft, cozy, and big! It's perfect for the occasion. I also decided to wear my Swede black booties from Macy's! These amazing booties are so comfortable and fit true to size. I also bought these oversized boyfriend cut jeans from Macy's on cyber monday! I love them because they cropped at the bottom, which is perfect for showing off your shoes!
I hope everyone enjoys their work week!
Only 15 days until Christmas!
Shoes: Macy's
Pants: Macy's
Sweater: Loft
Hair: Barefoot Blonde Hair (Color Sandy Blonde)
Earrings: Kendra Scott
xoxo,
Skyler
Friday, December 8, 2017
Winter Wonderland


Happy First Snow Day!
I hope everyone had an amazing Friday! I took the day off and enjoyed some Christmas shopping with my momma! Then I came home and took the longest nap EVER! It is something about taking a nap when its snowing that makes you feel like you are literally in heaven!
I have always enjoyed the snow and I really enjoy all that comes with it! Naps, pictures, fireplaces, blankets, and hot coco! It's always the most wonderful time of the year!
I found this amazing dress on Cyber Monday at Old Navy.com for only $24! It came in the mail this week and I think it might be my favorite dress of all time. I love the perfect length of this dress. I also snagged up these booties at Macy's.com on Cyber Monday for $34 and it was buy a pair get a pair free!
I have lots of content coming to the blog soon, and I am so excited to share all of my great outfit finds with you!
Dress: Old Navy
Shoes: Macy's
Hair: Barefoot Blonde Hair (color Sandy Blonde)
Tights: J.Crew
xoxo,
Skyler
Saturday, November 25, 2017
Farmhouse Christmas Decor


Main Christmas Tree
Happy Saturday everyone! I hope all of you have had a wonderful thanksgiving holiday! I love the holidays because that means more food and extra time with the family! I have always enjoyed everything about Thanksgiving and Christmas!
One of my favorite parts about Christmas is decorating! As most of you know I graduated Liberty University with a degree in Interior Design. I am not a "interior" designer, but I design products/work sales for big companies all across the United States! Wayfair, Pottery barn, Bellacor, etc. I am constantly shopping/ looking for new trends online everyday as my job! So how can I not want to have the most up to date home when I work with trends everyday?
This year is the first year being married, and the first time decorating my own home (which makes it even more fun). I would consider my home/style farmhouse! So when decorating for Christmas I am not the girl who puts up the average green and red Christmas tree (there is nothing wrong with that). I always find myself trying to come up with the most unique Christmas tree styles. It is very hard when all most all of your house is white on the inside.
This year I wanted a farmhouse tree and that is exactly what I did. Let me tell you guys a little trick. Always, Always, Always buy big ornaments! Also, another trick is to buy a skinner tree that way it is simpler to decorate, and achieve that "look" you are going for. It is so important to truly stick with a theme. There are literally so many cute ornaments out there (aka targets selection) but that doesn't mean buy every ornament that you` think is cute. I always have to hold myself back. It's so important to stick with your theme, because one wrong color/style of an ornament will ruin your whole look.
Lastly, the more lights and ornaments the better! Sometimes you have to spend a little extra to make your tree look beautiful!
Mudroom Christmas Décor
Trying to plan for my Christmas home décor has been so fun! I believe my favorite room in the house would have to be the mudroom! I think it's a time to be unique and pretty traditional! I decorated this room with a "real" small tree, a sign from Kirklands that says "Merry Christmas", and a 1900's antique Boones mill T.M Wood box.
Decorating for Christmas was so fun this year and I hope you get to enjoy decorating as much as I did!
Christmas Tree: Michael's
White sparkling ornaments: Crate and Barrel
White knitted garland: Crate and Barrel
Antlers: A.C. Moore
Cotton/Eucalyptus: A.C. Moore
Painted Ornaments: Homegoods
Gingerbread men: Handmade by me... See the link to get recipe.
https://thefarmfreshbyskyler.blogspot.com/2017/11/holiday-diy-gingerbread-ornaments.html
Stocking: Homegoods
Ladder: Wayfair
Blanket: TJmaxx
"Merry Christmas" sign: Kirklands
xoxo,

Tuesday, November 14, 2017
Drying Oranges


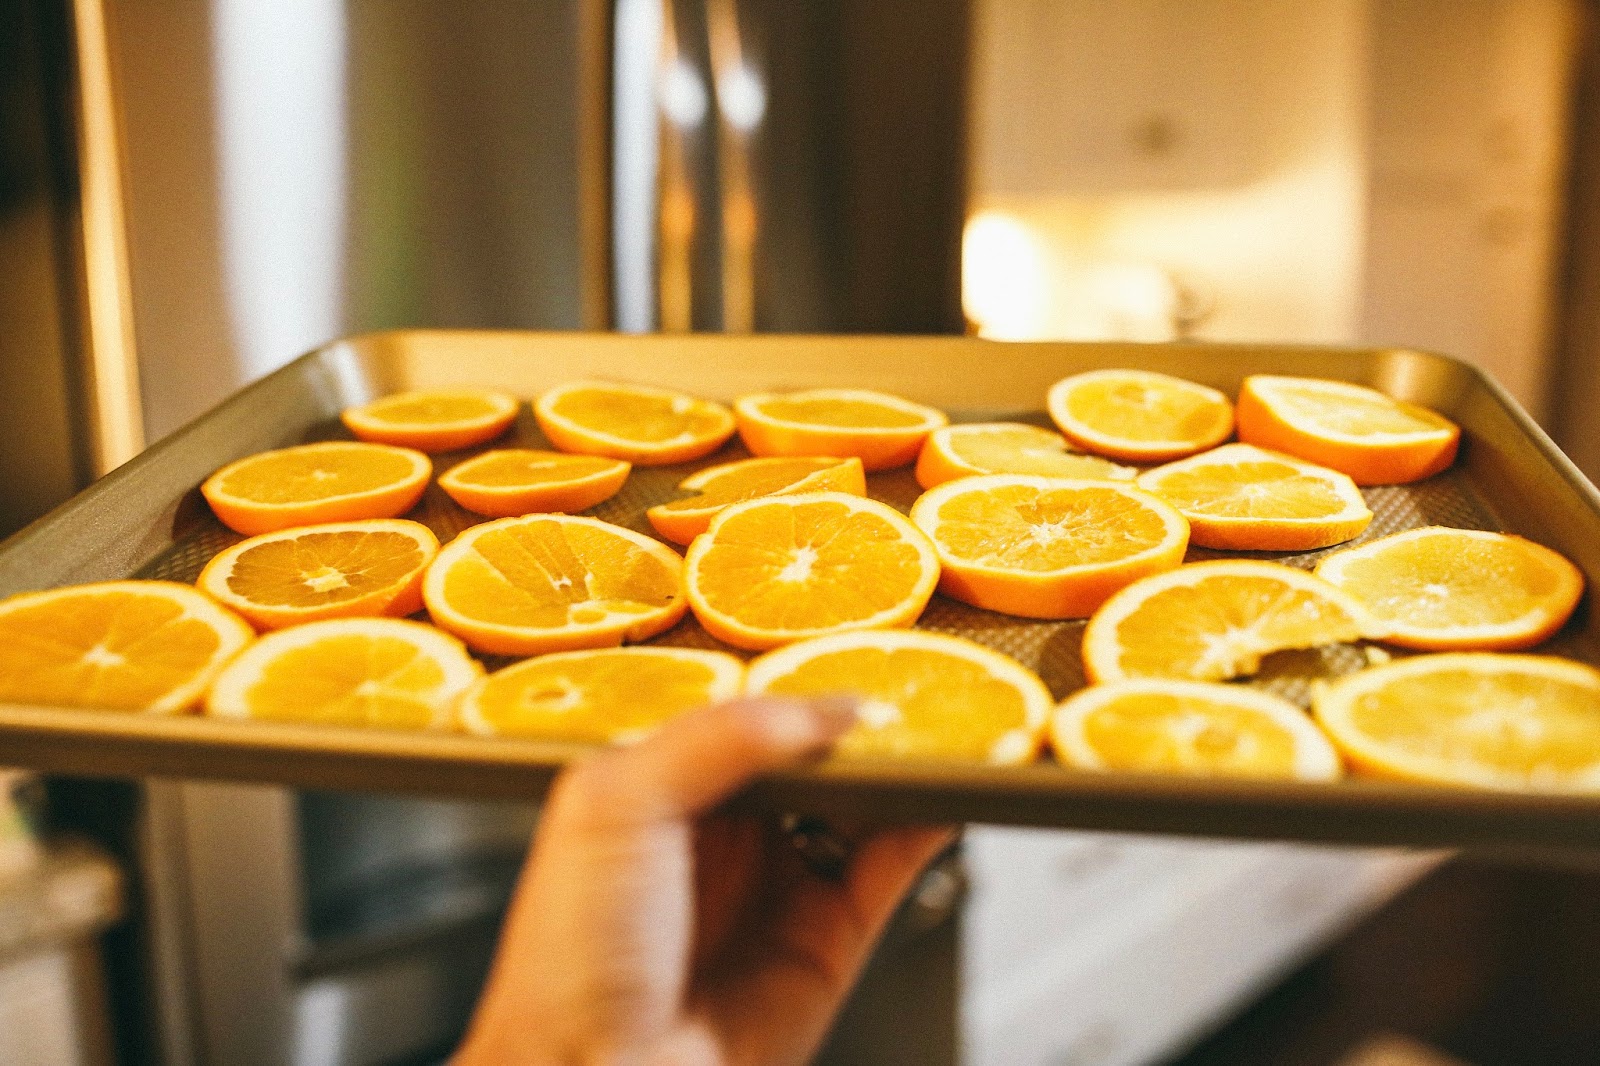
Is there anything quite as festive as the smell of oranges? The smell takes me back to when my mom use to dry out oranges for around the house. While they are baking they smell so good, and then once they are baked and dried out, they make lovely decorations too! You can string them into a garland or hang them on on a Christmas tree, but I am adding mine to Christmas gifts! I love gift wrapping and every year I always think of something fun to add to each gift! I will also add a few of these to my Christmas tree.
They're really simple to make. I just sliced up some oranges into thin slices and laid them on a kitchen towel to absorb any excess juice. I left them to drain there for awhile, and put an extra layer of paper towels on top to cover both sides. Once most of the juices drain, I put them on a baking tray and put them in the oven. I put them in the oven on 176 Degrees F and cook around 2-3 hours. When they have dried out and become firm, I just took them out and left them to cool.
They also last really well. I know my mom use to keep hers for years. As long as you store them in air tight plastic container and not just a cardboard box, otherwise I am sure you will have some creatures in there with you next December!
Enjoy!
xoxo,
Skyler
Monday, November 6, 2017
Holiday DIY Gingerbread Ornaments


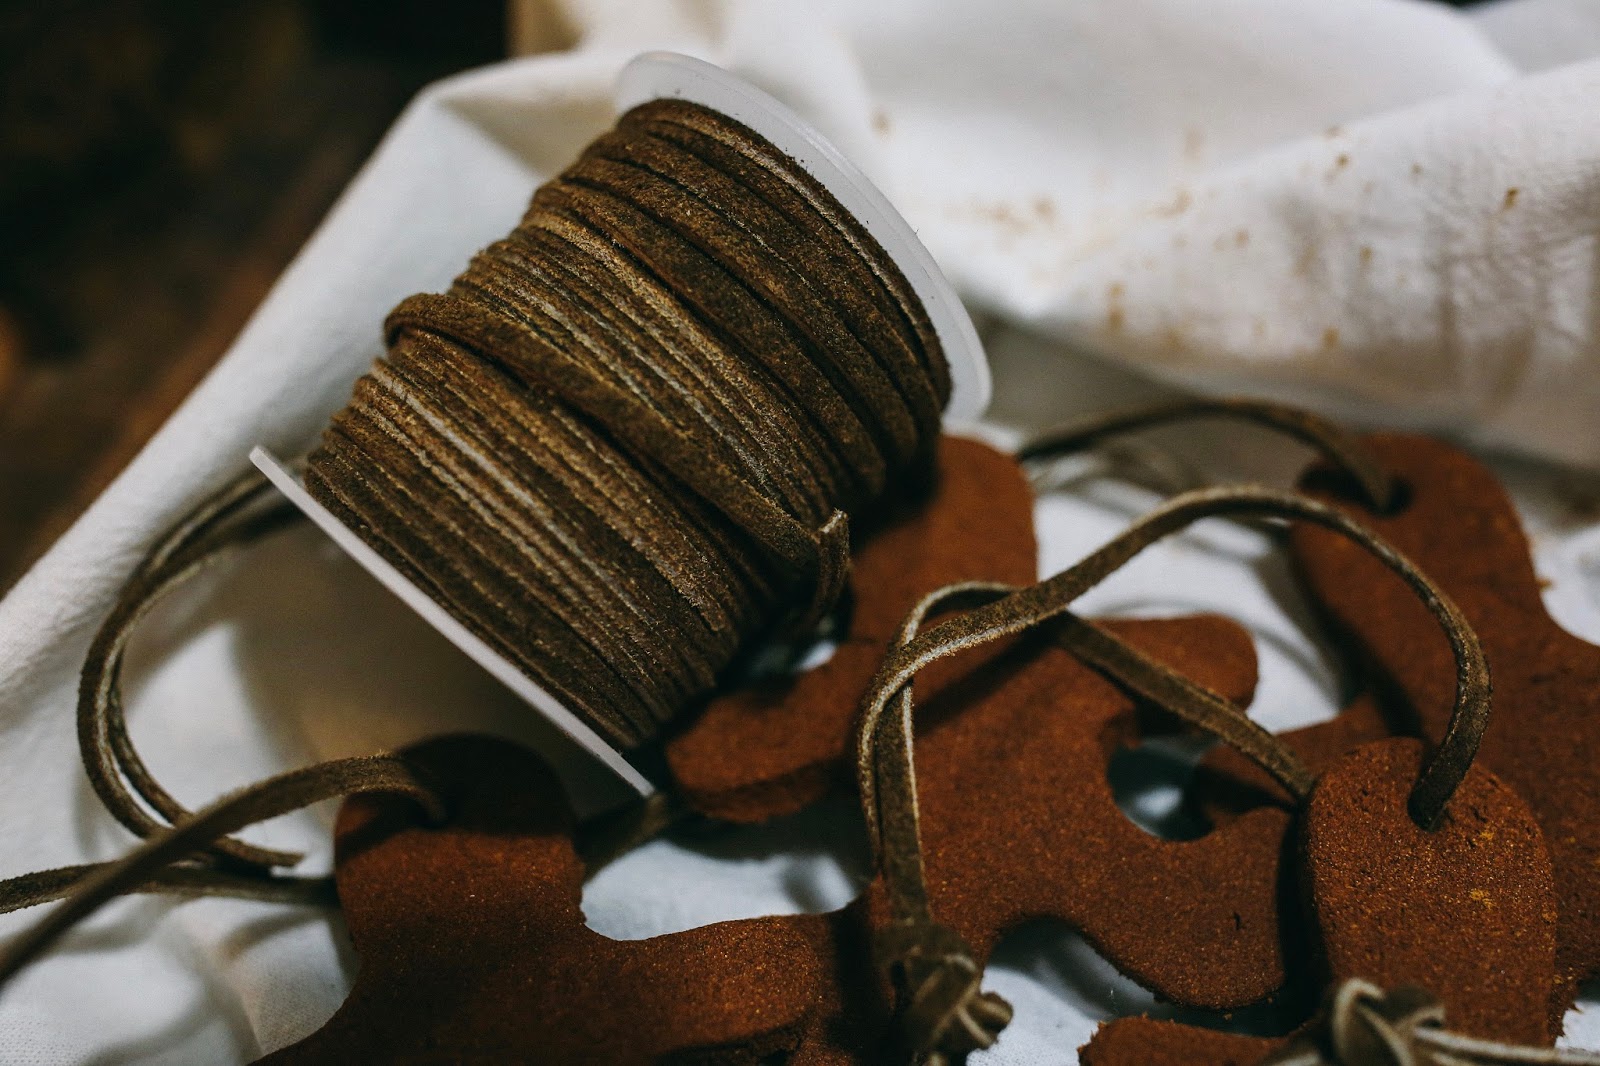

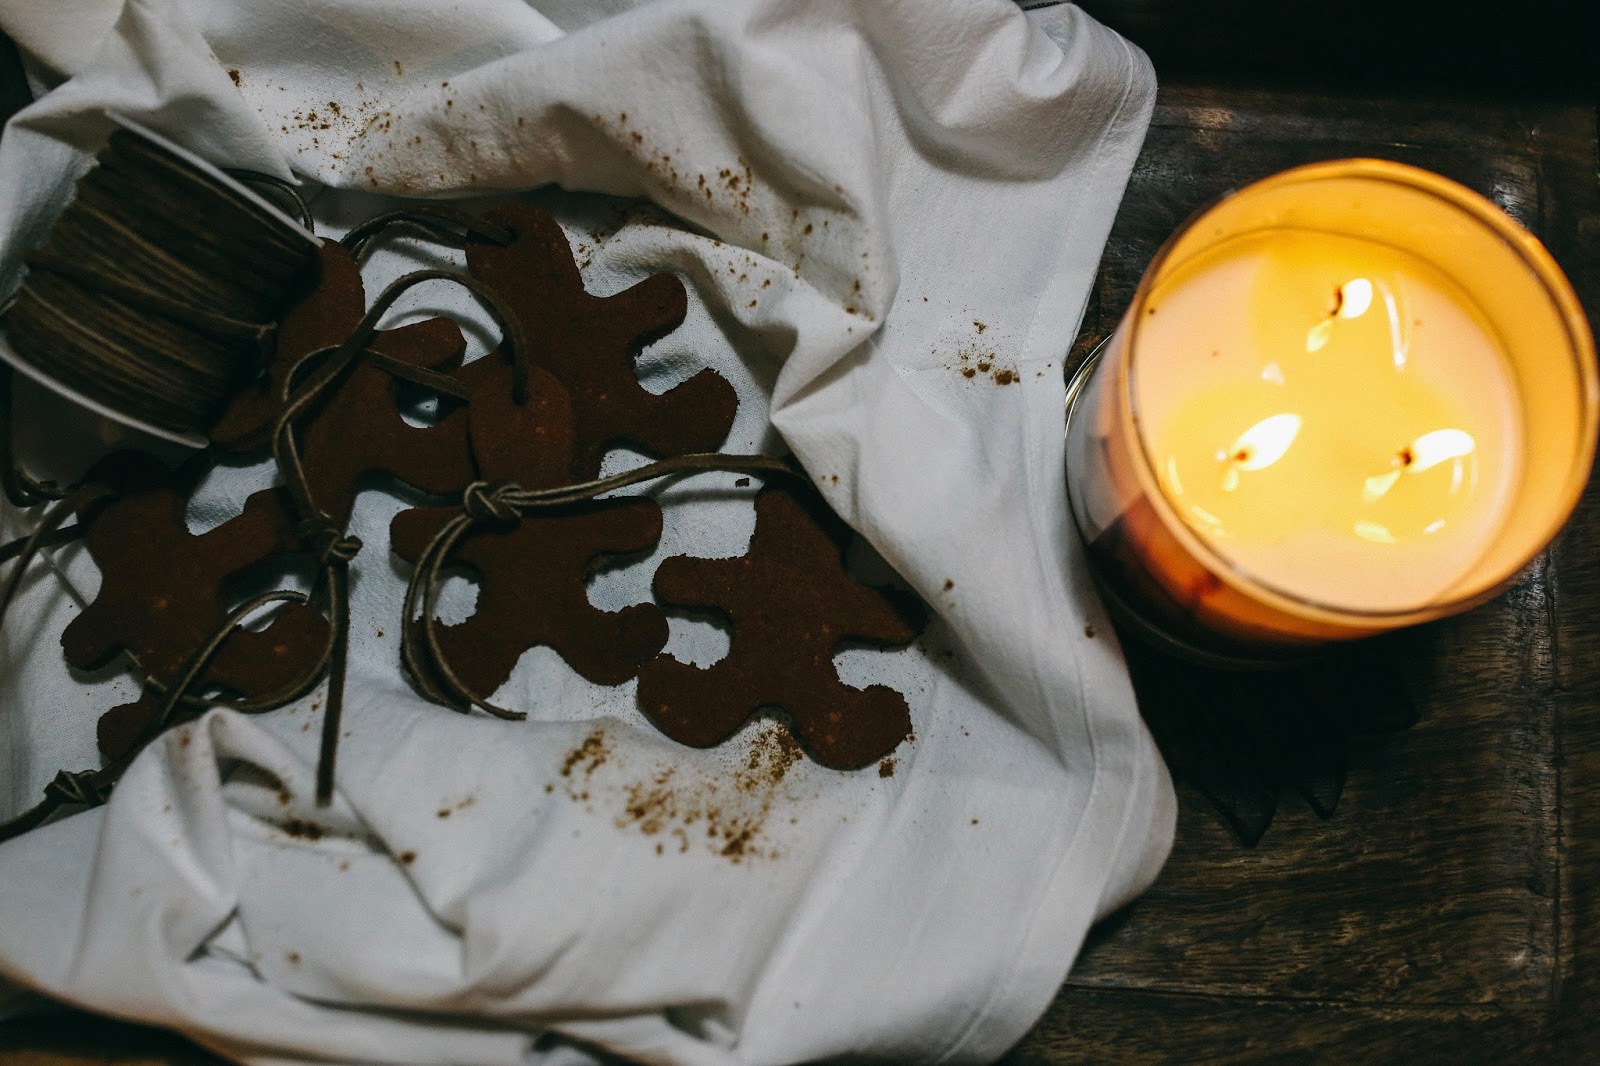
Happy Monday everyone! I was looking forward to tonight's post since this morning! I am very picky when it comes to DIY projects because sometimes I feel like I can buy it for a cheaper price and not have to do any work. So why spend all your energy and effort on something you can buy? Now for this project I am about to share with you all is worth the effort!
1. It makes your house smell amazing!
2. It is cheap and affordable
3. Great to do with kids
4. It creates the perfect Christmas tree ornaments.
5. They make your house smell amazing even after they are on your tree
Also, here is a little tip.... make sure to tell your husband/dad/friend that they are ornaments and you cant eat them. My husband thought they were cookies and he found out the hard way.
What you need:
3/4 cup of applesauce
2 bottles of mccormick cinnamon (2.37 oz each)
Cookie Cutter
Drinking Straw
Ribbon
Instructions:
1. Preheat oven to 200°F. Mix applesauce and cinnamon in small bowl until a smooth ball of dough is formed. (You may need use your hands to incorporate all of the cinnamon.) Using about 1/4 of the dough at a time, roll dough to 1/4-inch to 1/3-inch thickness between two sheets of plastic wrap. Peel off top sheet of plastic wrap. Cut dough into desired shapes with 2- to 3-inch cookie cutters. Make a hole at top of ornament with drinking straw or skewer. Place ornaments on baking sheet
2. Bake 2 1/2 hours. Cool ornaments on wire rack. (Or, to dry ornaments at room temperature, carefully place them on wire rack. Let stand 1 to 2 days or until thoroughly dry, turning occasionally.)
3. Insert ribbon through holes and tie to hang. Decorate with opaque paint markers, found in arts and crafts stores, if desired.
xoxo,
Skyler
Saturday, November 4, 2017
The Pretiest Pumpkin Pie
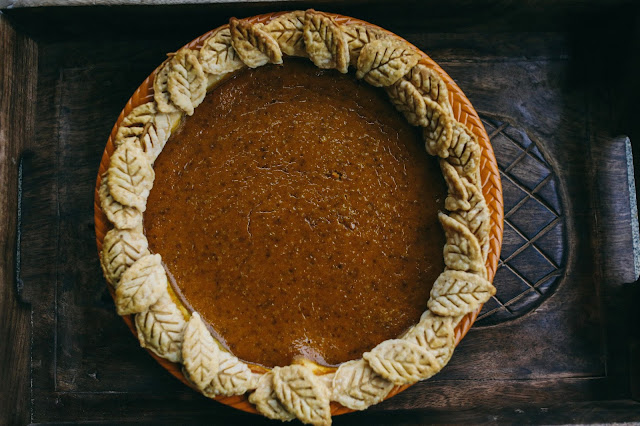


Happy Fall! I am so excited because my family is coming to my house to eat dinner for the first time since I got married! Since I am hosting them tonight I thought I would make something special. The good thing about this pumpkin pie is it looks beautiful but it tastes better! See below for the recipe!
What you need:
- 3/4 cup granulated sugar.
- 1 teaspoon ground cinnamon.
- 1/2 teaspoon ground ginger.
- 1/4 teaspoon ground cloves.
- 2 large eggs.
- 1 can (15 oz.) LIBBY'S® 100% Pure Pumpkin.
- 1 can (12 fl. oz.) NESTLÉ® CARNATION® Evaporated Milk.
- 1 unbaked 9-inch (4-cup volume) deep-dish pie shell
MIX sugar, cinnamon, salt, ginger and cloves in small bowl. Beat eggs in large bowl. Stir in pumpkin and sugar-spice mixture. Gradually stir in evaporated milk.
POUR into pie shell.
BAKE in preheated 425° F oven for 15 minutes. Reduce temperature to 350° F; bake for 40 to 50 minutes or until knife inserted near center comes out clean. Cool on wire rack for 2 hours. Serve immediately or refrigerate. Top with whipped cream before serving.
POUR into pie shell.
BAKE in preheated 425° F oven for 15 minutes. Reduce temperature to 350° F; bake for 40 to 50 minutes or until knife inserted near center comes out clean. Cool on wire rack for 2 hours. Serve immediately or refrigerate. Top with whipped cream before serving.
To make the leaves around the edge I just used the extra deep dish pie shell and used a leaf cookie cutter and laid them on top of the pie!
Enjoy!
xoxo,
Skyler
Tuesday, October 31, 2017
Sunday Country Style Steak


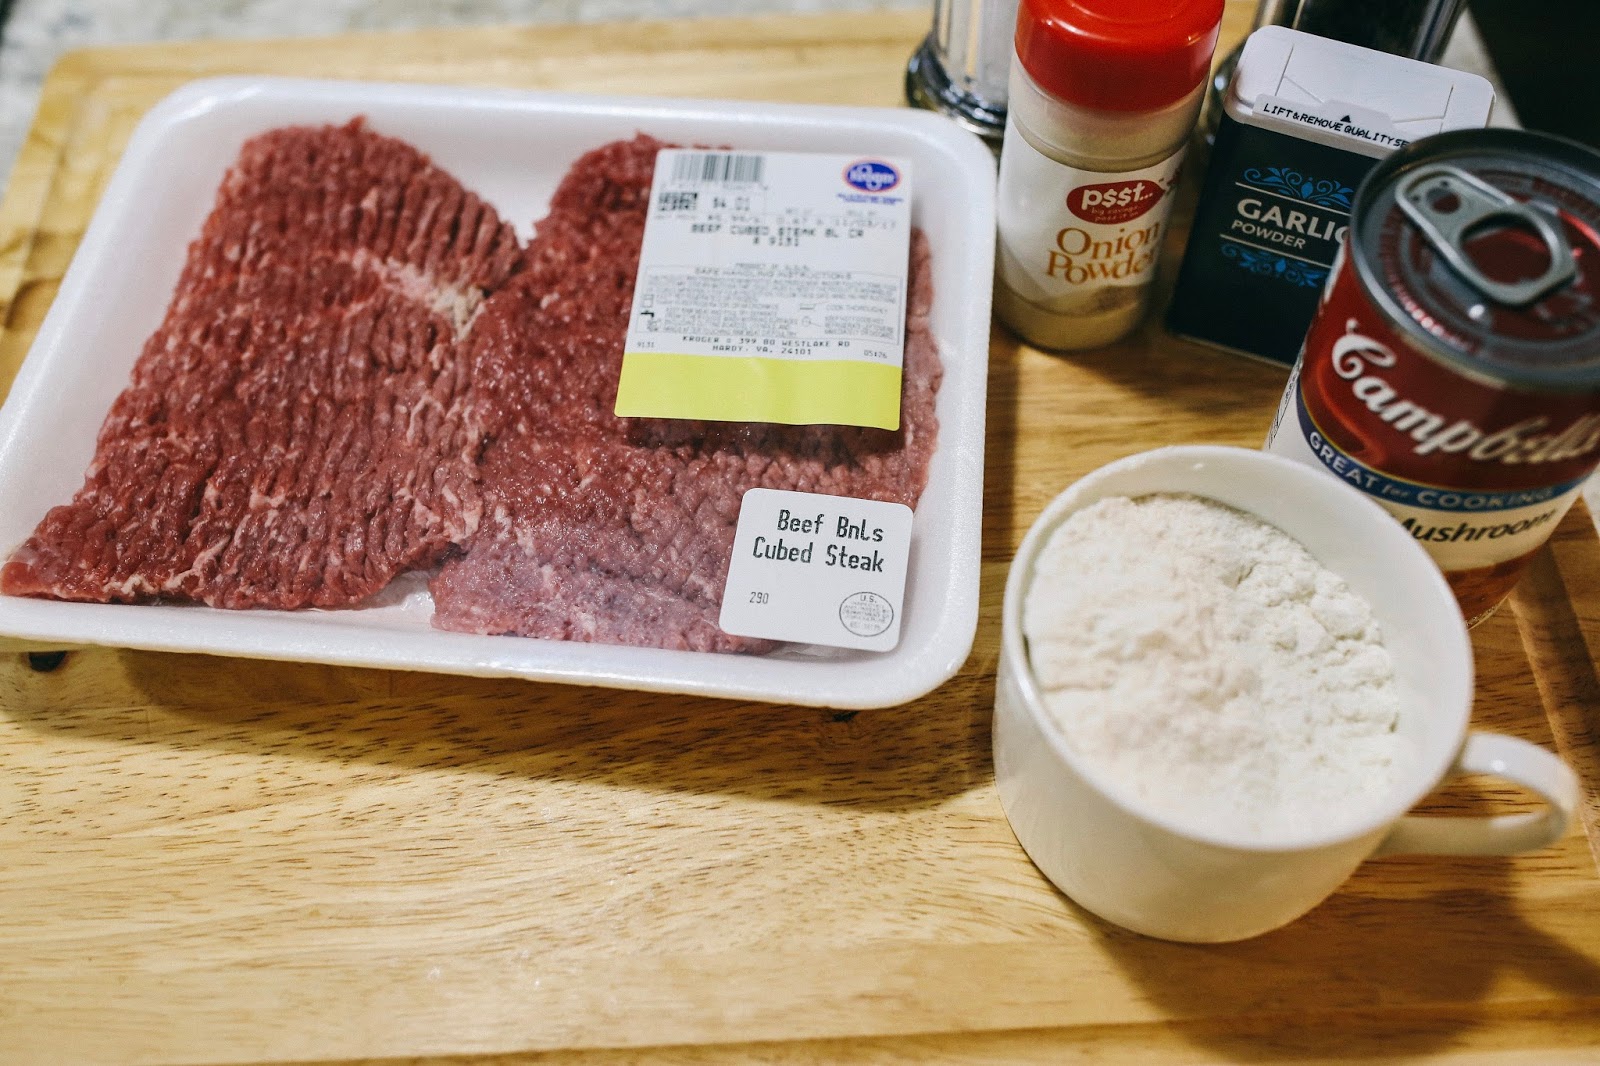


Hello Everyone! I am excited to share with you guys my favorite recipe of all time on my blog tonight! Do you ever wish you could be cooking on something while your at church on Sunday morning, and it be ready when you walk in the door? This recipe is perfect for that occasion! It is one for the books!
Ingredients
1lb. cubed beef steak
salt, pepper, onion and garlic powders, and flour for breading
2 T. vegetable oil
1 (10 1/2 oz.) can golden mushroom soup
1 (10 1/2 oz.) can of water
Instructions:
Preheat oven to 300 degrees. Sprinkle salt, pepper, onion and garlic powders on both sides of steaks, then roll in flour. Heat vegetable oil in a large frying pan. Brown steaks on each side over medium heat until juices begin to run out of steaks (about 5 minutes). Place steaks in a 9"x13"x2" baking dish. Add soup and water to pan drippings. Stir and bring to a boil. Pour over steaks and cover with foil. Bake 15 minutes. Reduce heat to 250 degrees and bake 2 hours. This recipe can easily be doubled. Serves 2-3
Enjoy!
xoxo,
Skyler
Tuesday, October 10, 2017
Rainy Day Treats
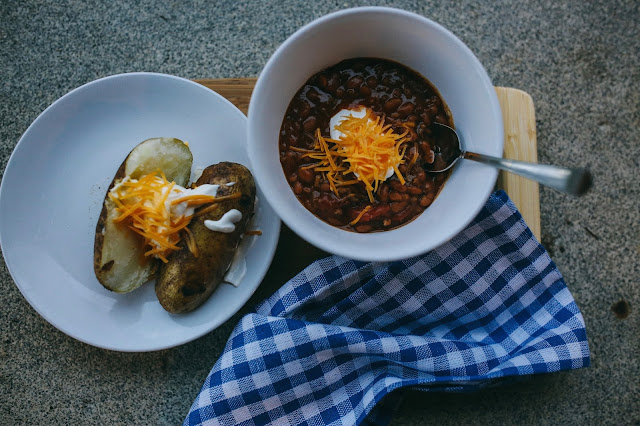


Hi everyone! Glad it's not Monday! Anyways, today I am sharing a recipe I just tried and it's one for the books. It's my mother-in-laws chili recipe. I love chili on a good crisp fall day! Unfortunately when I made my grocery list for the week I didn't realize it was suppose to be 80 degrees and humid, so chili wasn't the best choice for dinner tonight, but it still hit the spot! I also made bake potatoes. See below for the recipes!
Chili
Ingredients:
1 can of Del Monte stewed Tomatoes (Italian Recipe)
2 cans of original baked beans (I get the 16oz can)
French's Chili-O Seasoning Mix
1lb of ground beef
Instructions
1. Cook your hamburger meat in frying pan
2. Put the baked beans, stewed tomatoes, chili-o mix, meat, and 1/4 cup of water in a pot and let it simmer for 30 minutes
3. Add your own toppings (cheese, sour cream, etc).
Baked Potato
Ingredients:
olive oil
garlic powder
Salt
pepper
Instructions
1. Heat oven to 400 degrees
2. add aluminum foil to cooking sheet
3. rub olive oil on potatoes
4. Sprinkle salt, pepper, and garlic powder on potatoes
5. Cook for 60 minutes
6. Enjoy
xoxo,
Skyler
Saturday, September 30, 2017
The Farm Fresh By Skyler


Hi Everyone,
I am so glad you are reading my blog and making this dream of mine a reality. If you have read my blog before I am sure you’re wondering why the layout and name look so different. I have officially changed my blog name! I really thought long and hard about what I was going to name it. I had a really hard time picking out a name because I blog about everything, fashion, interiors, cooking, and anything in between. So after many years of thought I finally figured it out.
As many of you know I am married to a cowboy and when I say cowboy I don’t mean he dresses up in boots & does nothing. He is a real cowboy! Constantly dealing with cows and he is a very very good roper. He won the US Team roping in 2016 in Las Vegas! He is a legend in my eyes and continues to amaze me daily with his talent.
Considering I am married to a cowboy, I have to be the wife of a cowboy. I don’t think you guys realize how hard it is to be married to one. COWBOYS EAT GOOD! That is one reason as to why I call this blog “The Farm Fresh”. I make my cowboy dinner every single night and I love it. I love cooking, and I do have to say I am a pretty good cook for my age. Now if you compare me to my grandma or sister-in-law I am not the best. They are the best cooks I know.
Another reason I call this blog “The Farm Fresh” is because I am constantly in my garden. I grow everything, and anything you can think of. I can’t wait to start sharing my gardening 101 tips with you guys!
As for Interiors I would consider myself to be a “farmhouse” girl. I love a good southern home. I love having guest and keeping my house open for company on the regular. It’s always the southern thing to do.
This blog is a little about my lifestyle and the things I love! Welcome to The Farm Fresh blog by Skyler :)
Enjoy!
xoxo,
Skyler
Tuesday, September 26, 2017
The Perfect Homemade Pizza


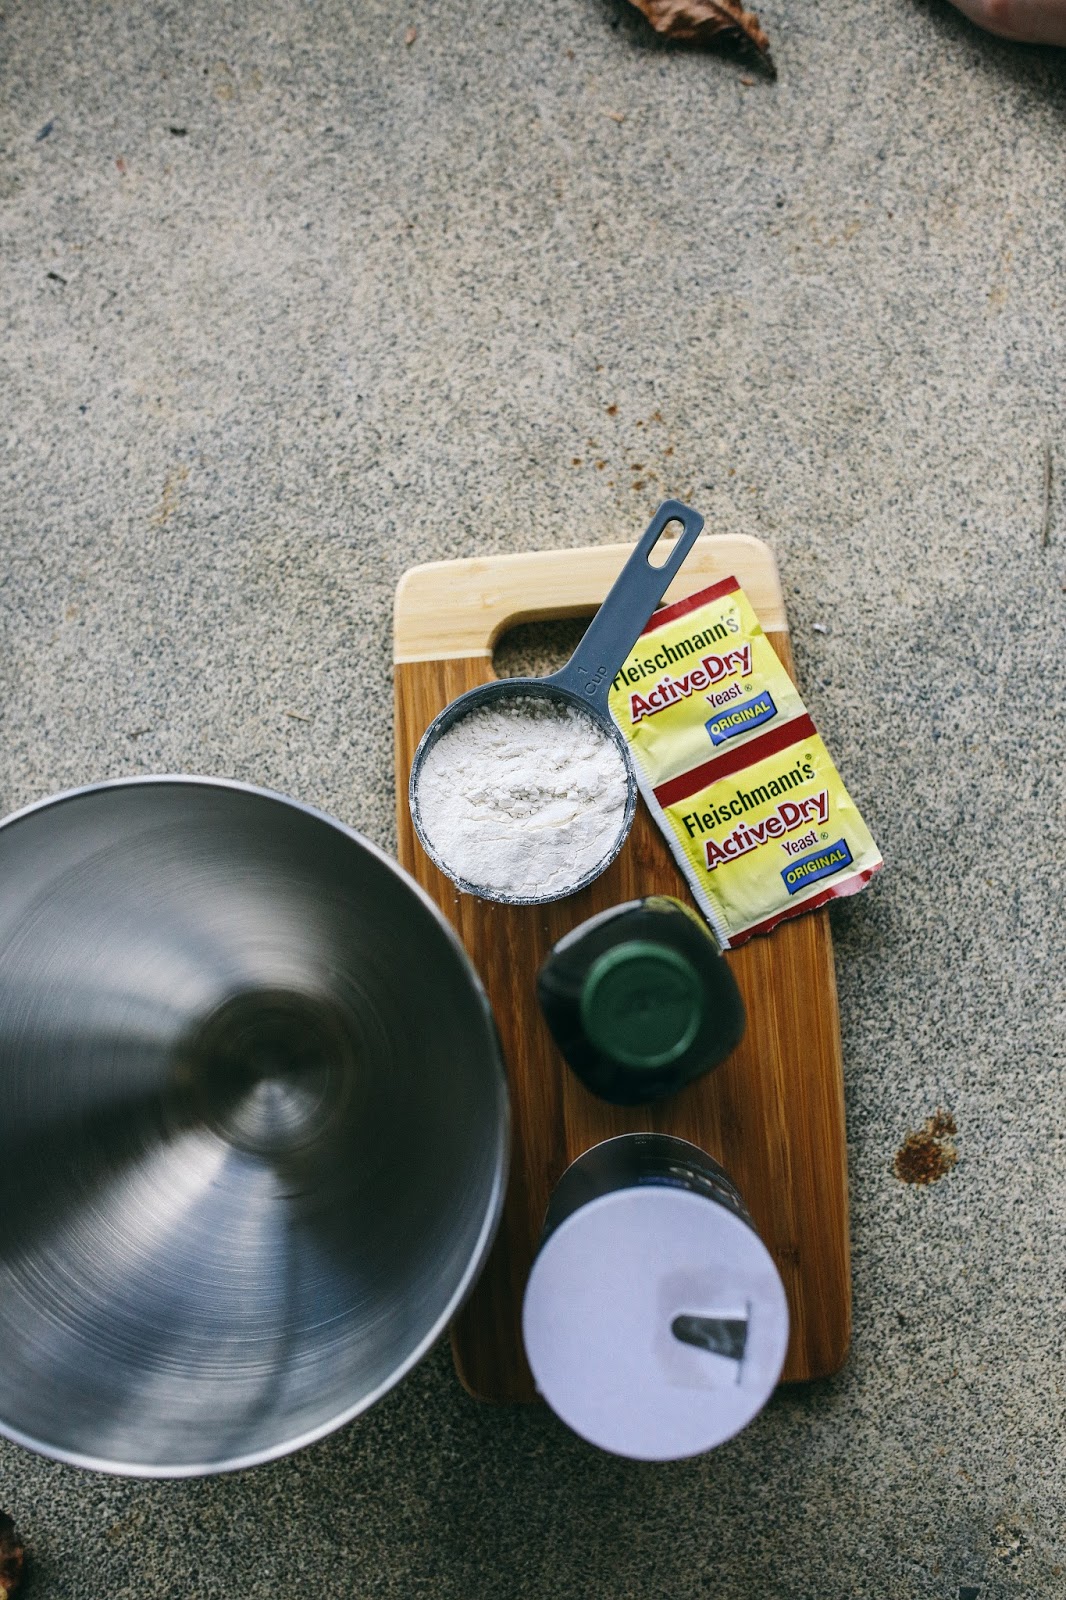


Tuesday's are for pizza! I would have to say Pizza is my all time favorite food. It's even better when you make it yourself. I have made homemade pizza probably 30 times in my lifetime and it never disappoints. This recipe is for those of you who have a Kitchen Aid. I am sure you could somehow do this without one but this recipe is really for Kitchen Aid use only.
What you need:
1 package active dry yeast
1 cup warm water
1/2 tsp salt
2 tsp olive oil
2 1/2-3 cups of all-purpose flour
Directions:
1. Dissolve yeast in warm water in your kitchen aid mixing bowl. Add salt, olive oil, and flour. Attach bowl and dough hook to your mixer. Turn to speed 2 and mix about 1-2 minutes. (until dough forms into a ball, like above).
2. Place dough in greased bowl, and cover with towel to keep warm. Leave it sitting for about 1 hour. The dough should rise.
3. Brush your pizza pan with oil. Role out your dough and place on pizza dish. Make the edging of the crust thick so the toppings wont fall off.
4. Add all of your toppings. In the above image I added green peppers, sausage, ham, and cheese.
5. Bake at 450 degrees for 15-20 minutes
Enjoy!
xoxo,
Skyler
Subscribe to:
Comments (Atom)


