
Saturday, November 25, 2017
Farmhouse Christmas Decor


Main Christmas Tree
Happy Saturday everyone! I hope all of you have had a wonderful thanksgiving holiday! I love the holidays because that means more food and extra time with the family! I have always enjoyed everything about Thanksgiving and Christmas!
One of my favorite parts about Christmas is decorating! As most of you know I graduated Liberty University with a degree in Interior Design. I am not a "interior" designer, but I design products/work sales for big companies all across the United States! Wayfair, Pottery barn, Bellacor, etc. I am constantly shopping/ looking for new trends online everyday as my job! So how can I not want to have the most up to date home when I work with trends everyday?
This year is the first year being married, and the first time decorating my own home (which makes it even more fun). I would consider my home/style farmhouse! So when decorating for Christmas I am not the girl who puts up the average green and red Christmas tree (there is nothing wrong with that). I always find myself trying to come up with the most unique Christmas tree styles. It is very hard when all most all of your house is white on the inside.
This year I wanted a farmhouse tree and that is exactly what I did. Let me tell you guys a little trick. Always, Always, Always buy big ornaments! Also, another trick is to buy a skinner tree that way it is simpler to decorate, and achieve that "look" you are going for. It is so important to truly stick with a theme. There are literally so many cute ornaments out there (aka targets selection) but that doesn't mean buy every ornament that you` think is cute. I always have to hold myself back. It's so important to stick with your theme, because one wrong color/style of an ornament will ruin your whole look.
Lastly, the more lights and ornaments the better! Sometimes you have to spend a little extra to make your tree look beautiful!
Mudroom Christmas Décor
Trying to plan for my Christmas home décor has been so fun! I believe my favorite room in the house would have to be the mudroom! I think it's a time to be unique and pretty traditional! I decorated this room with a "real" small tree, a sign from Kirklands that says "Merry Christmas", and a 1900's antique Boones mill T.M Wood box.
Decorating for Christmas was so fun this year and I hope you get to enjoy decorating as much as I did!
Christmas Tree: Michael's
White sparkling ornaments: Crate and Barrel
White knitted garland: Crate and Barrel
Antlers: A.C. Moore
Cotton/Eucalyptus: A.C. Moore
Painted Ornaments: Homegoods
Gingerbread men: Handmade by me... See the link to get recipe.
https://thefarmfreshbyskyler.blogspot.com/2017/11/holiday-diy-gingerbread-ornaments.html
Stocking: Homegoods
Ladder: Wayfair
Blanket: TJmaxx
"Merry Christmas" sign: Kirklands
xoxo,

Tuesday, November 14, 2017
Drying Oranges


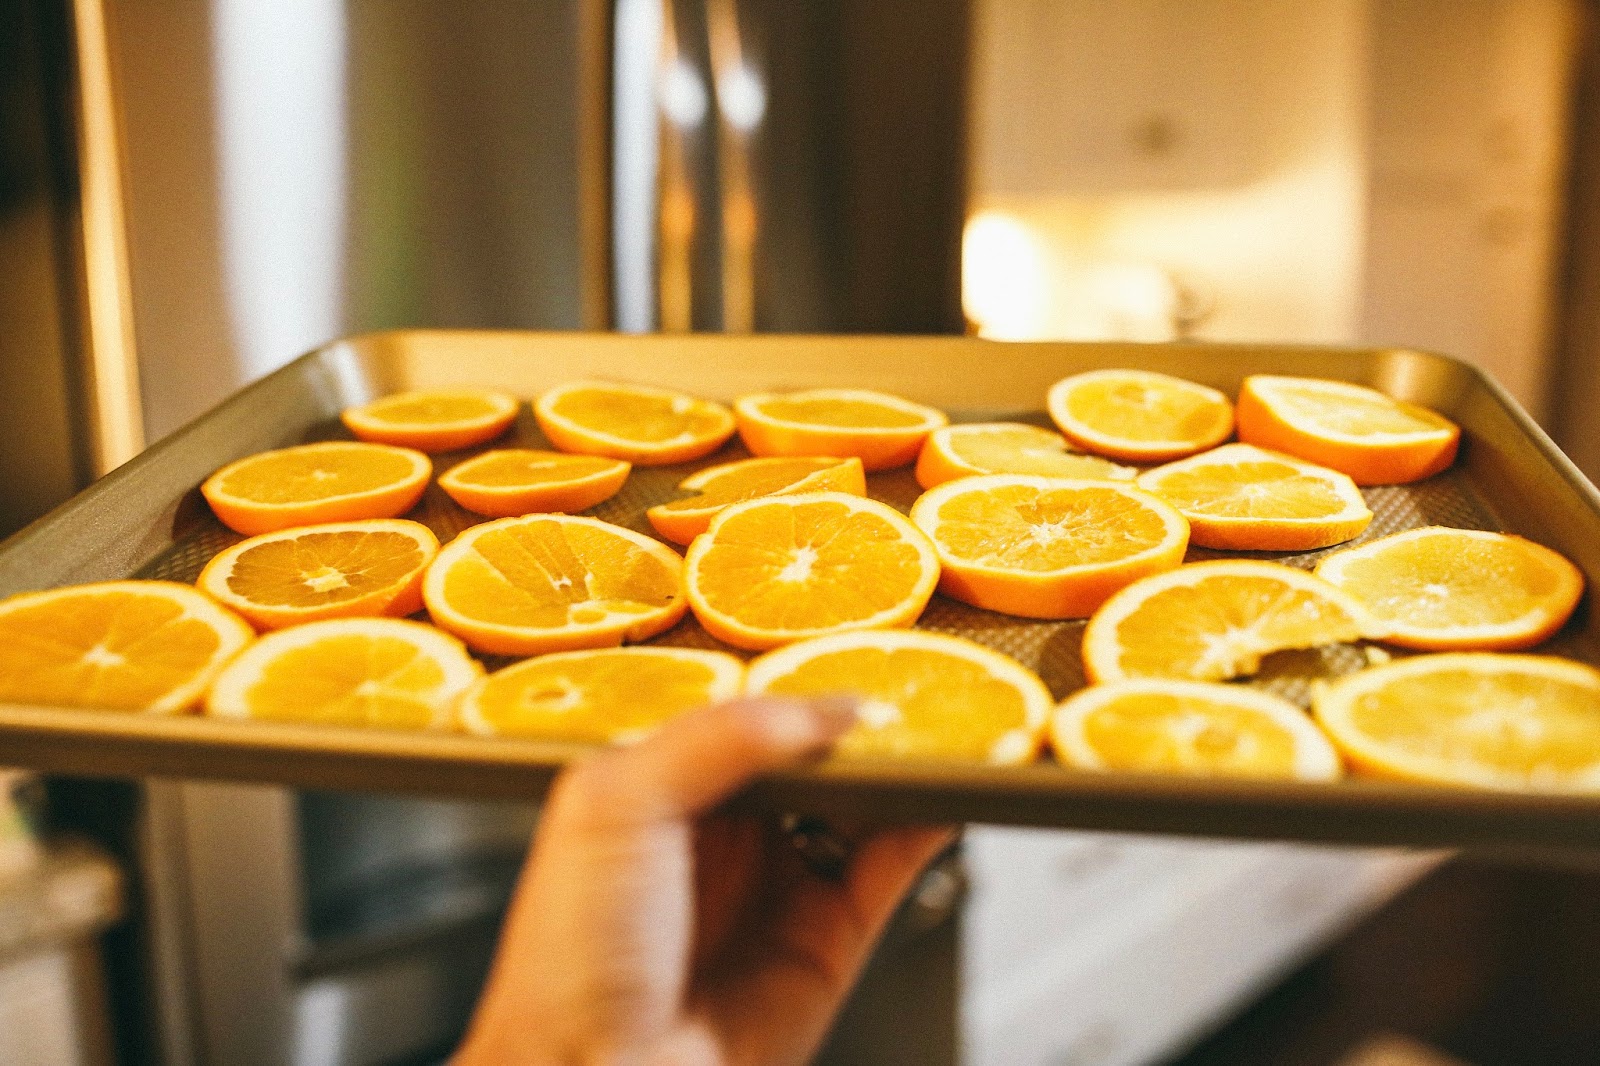
Is there anything quite as festive as the smell of oranges? The smell takes me back to when my mom use to dry out oranges for around the house. While they are baking they smell so good, and then once they are baked and dried out, they make lovely decorations too! You can string them into a garland or hang them on on a Christmas tree, but I am adding mine to Christmas gifts! I love gift wrapping and every year I always think of something fun to add to each gift! I will also add a few of these to my Christmas tree.
They're really simple to make. I just sliced up some oranges into thin slices and laid them on a kitchen towel to absorb any excess juice. I left them to drain there for awhile, and put an extra layer of paper towels on top to cover both sides. Once most of the juices drain, I put them on a baking tray and put them in the oven. I put them in the oven on 176 Degrees F and cook around 2-3 hours. When they have dried out and become firm, I just took them out and left them to cool.
They also last really well. I know my mom use to keep hers for years. As long as you store them in air tight plastic container and not just a cardboard box, otherwise I am sure you will have some creatures in there with you next December!
Enjoy!
xoxo,
Skyler
Monday, November 6, 2017
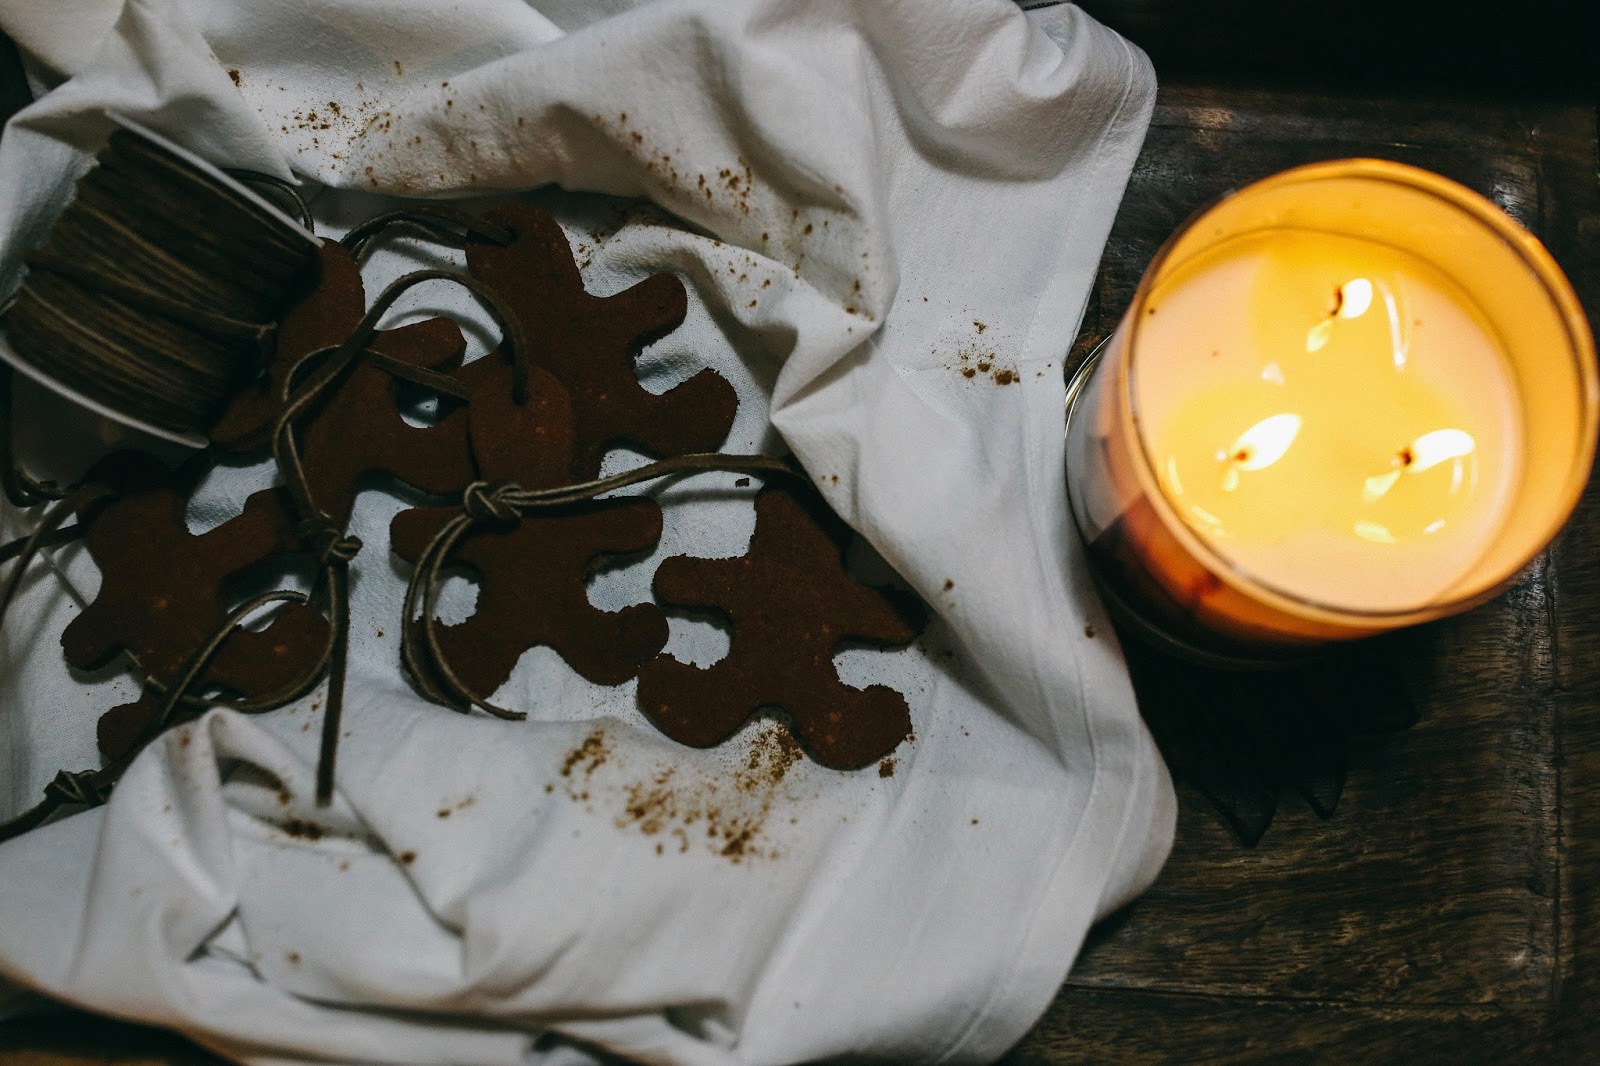
Holiday DIY Gingerbread Ornaments


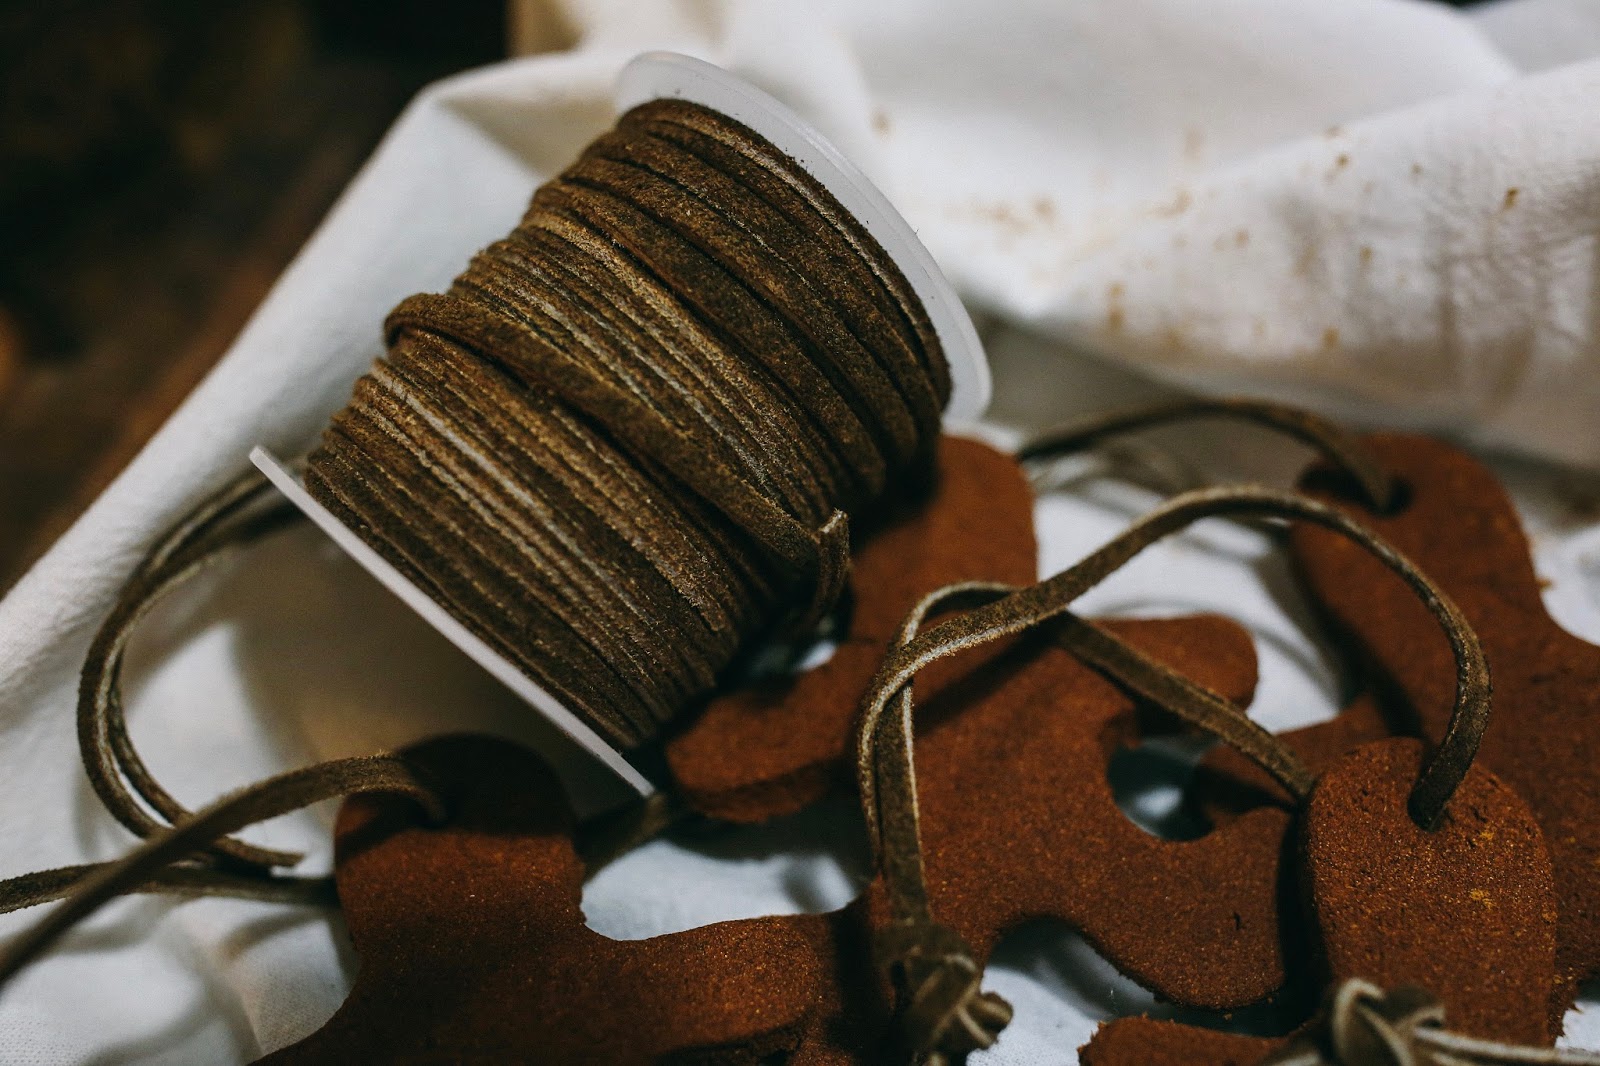

Happy Monday everyone! I was looking forward to tonight's post since this morning! I am very picky when it comes to DIY projects because sometimes I feel like I can buy it for a cheaper price and not have to do any work. So why spend all your energy and effort on something you can buy? Now for this project I am about to share with you all is worth the effort!
1. It makes your house smell amazing!
2. It is cheap and affordable
3. Great to do with kids
4. It creates the perfect Christmas tree ornaments.
5. They make your house smell amazing even after they are on your tree
Also, here is a little tip.... make sure to tell your husband/dad/friend that they are ornaments and you cant eat them. My husband thought they were cookies and he found out the hard way.
What you need:
3/4 cup of applesauce
2 bottles of mccormick cinnamon (2.37 oz each)
Cookie Cutter
Drinking Straw
Ribbon
Instructions:
1. Preheat oven to 200°F. Mix applesauce and cinnamon in small bowl until a smooth ball of dough is formed. (You may need use your hands to incorporate all of the cinnamon.) Using about 1/4 of the dough at a time, roll dough to 1/4-inch to 1/3-inch thickness between two sheets of plastic wrap. Peel off top sheet of plastic wrap. Cut dough into desired shapes with 2- to 3-inch cookie cutters. Make a hole at top of ornament with drinking straw or skewer. Place ornaments on baking sheet
2. Bake 2 1/2 hours. Cool ornaments on wire rack. (Or, to dry ornaments at room temperature, carefully place them on wire rack. Let stand 1 to 2 days or until thoroughly dry, turning occasionally.)
3. Insert ribbon through holes and tie to hang. Decorate with opaque paint markers, found in arts and crafts stores, if desired.
xoxo,
Skyler
Saturday, November 4, 2017
The Pretiest Pumpkin Pie
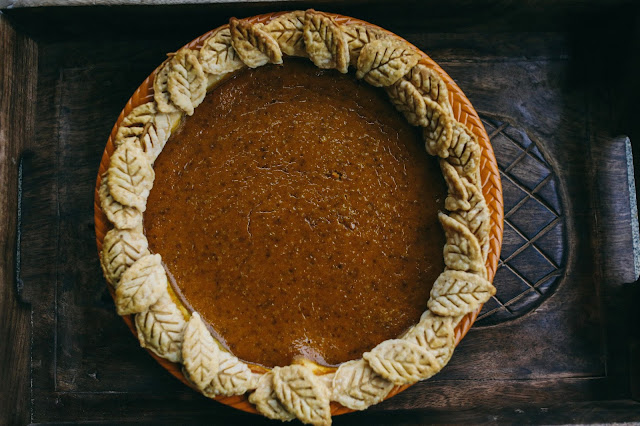


Happy Fall! I am so excited because my family is coming to my house to eat dinner for the first time since I got married! Since I am hosting them tonight I thought I would make something special. The good thing about this pumpkin pie is it looks beautiful but it tastes better! See below for the recipe!
What you need:
- 3/4 cup granulated sugar.
- 1 teaspoon ground cinnamon.
- 1/2 teaspoon ground ginger.
- 1/4 teaspoon ground cloves.
- 2 large eggs.
- 1 can (15 oz.) LIBBY'S® 100% Pure Pumpkin.
- 1 can (12 fl. oz.) NESTLÉ® CARNATION® Evaporated Milk.
- 1 unbaked 9-inch (4-cup volume) deep-dish pie shell
MIX sugar, cinnamon, salt, ginger and cloves in small bowl. Beat eggs in large bowl. Stir in pumpkin and sugar-spice mixture. Gradually stir in evaporated milk.
POUR into pie shell.
BAKE in preheated 425° F oven for 15 minutes. Reduce temperature to 350° F; bake for 40 to 50 minutes or until knife inserted near center comes out clean. Cool on wire rack for 2 hours. Serve immediately or refrigerate. Top with whipped cream before serving.
POUR into pie shell.
BAKE in preheated 425° F oven for 15 minutes. Reduce temperature to 350° F; bake for 40 to 50 minutes or until knife inserted near center comes out clean. Cool on wire rack for 2 hours. Serve immediately or refrigerate. Top with whipped cream before serving.
To make the leaves around the edge I just used the extra deep dish pie shell and used a leaf cookie cutter and laid them on top of the pie!
Enjoy!
xoxo,
Skyler
Subscribe to:
Comments (Atom)


